
By Rachel Opperman
Building an Accessible Software Product: The Accessibility Audit

In an ideal world, accessibility would be included as a software product is being built, but that's often not the case.
There are different reasons for this, but the good news is that any website or web app can be made accessible.
The first step is to find existing issues so we know what needs to be addressed.
You may be asking yourself why it's worth the effort, and that's a valid question. We have another post on why accessibility matters, so feel free to check that out.
At Zaengle, we're passionate about the importance of web accessibility. That's why we assessed Garbanzo and made a concerted effort to address its prior existing issues. But we had to find those issues first. We did this by performing a thorough accessibility audit.
If this seems daunting, don't worry. In this post, we'll discuss the automated tools and manual testing techniques that you can use to do your own accessibility audits.
An overview of accessibility auditing
There are two facets of a complete accessibility audit – utilizing automated tools and performing manual testing.
Automated tools will inspect your site and help find some of the following common issues (among many others):
- Text contrast issues
- Incorrectly ordered heading levels
- Links without discernible text
- Images that don't have alternative text
- Broken or empty links
Many automated tools are free and they can scan a page in a couple of minutes, so they're a quick, cost-effective way to find a variety of existing issues.
These tools can't find every issue, though, and they're upfront about it. This is where manual testing comes in.
Manual accessibility testing includes interacting with a site using only the keyboard, checking how it works with a screen reader, and double-checking questionable contrast ratios.
When we combine automated and manual testing, we can be confident that we'll find any issues that are present, resulting in a thorough accessibility audit. As a bonus, we'll also have a better understanding of how users of assistive technologies will interact with a site, which will be valuable information for future projects.
Let's check out some automated tools that can identify a wide variety of issues for us.
Automated tools
There are many automated tools for accessibility auditing. Here are three that we use when performing our own audits.
Lighthouse
Lighthouse is an open-source tool created by Google that comes pre-installed in Chrome and Brave. The Google Lighthouse add-on can also be installed in Firefox.
Lighthouse is a general tool; in addition to auditing accessibility, it can also be used to test performance, SEO, and more. You can view directions for using Lighthouse in the Chrome Developers documentation.
When you run a Lighthouse accessibility audit, you'll be given an overall score (out of 100) for the accessibility of the page. You'll also be given a breakdown of the issues that were detected, separated by category, along with a list of items that should be checked manually.
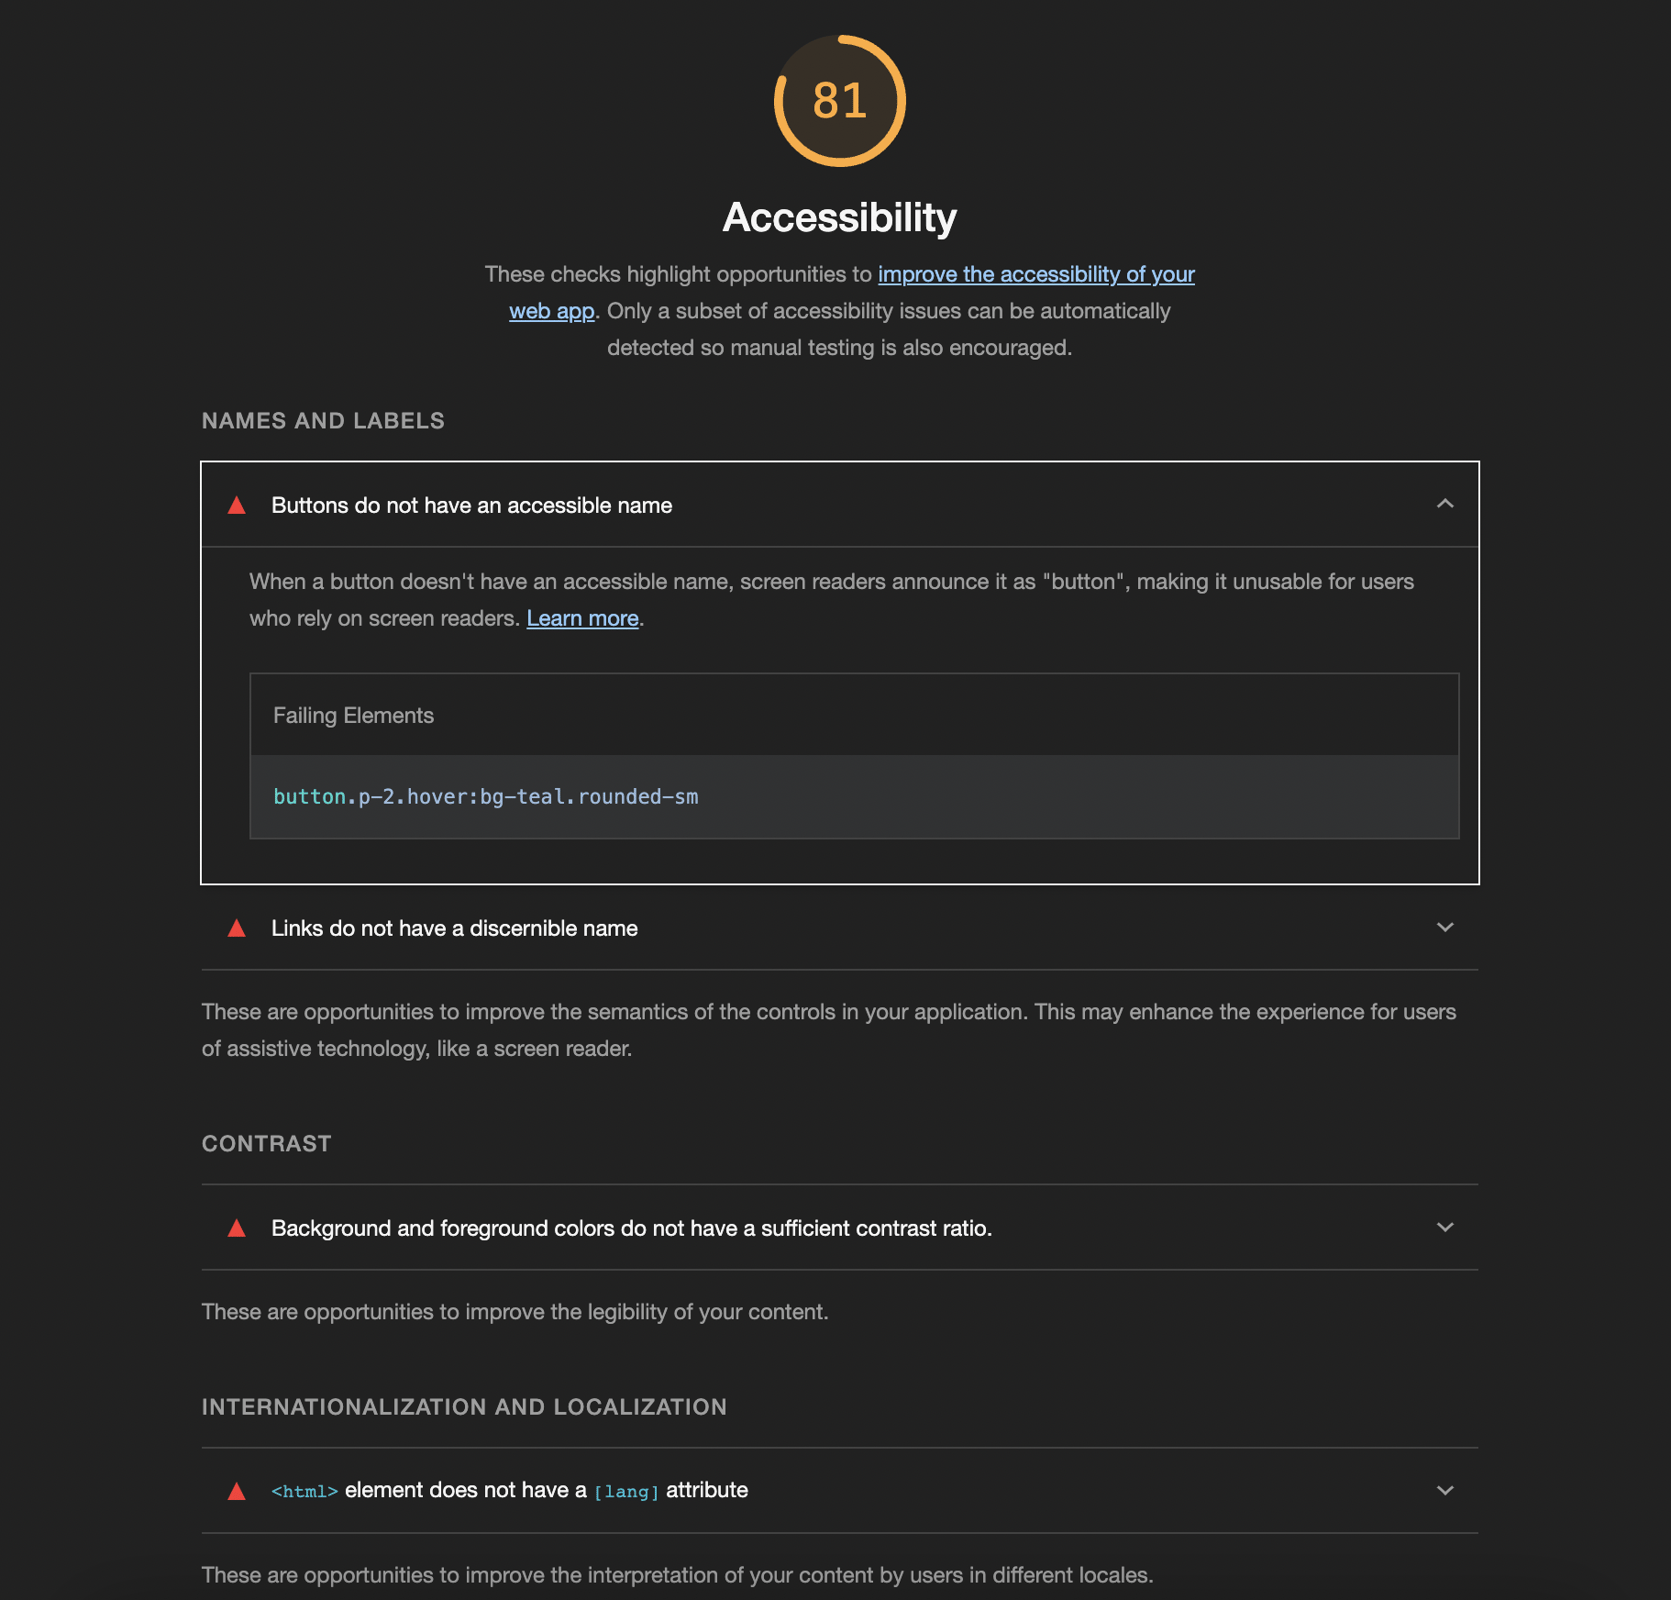
An example of Lighthouse accessibility audit results, including the overall page score out of 100 and a breakdown of detected issues. The details for each issue include the failing element(s) and an explanation of how the issue affects users of assistive technologies.
While this post focuses on using Lighthouse for performing on-demand audits, we'd be remiss if we didn't mention that it's not limited to being run as a devtool. It can also be run from the command line and as a Node module, which allows for automating Lighthouse audits and including them in integration tests. Lighthouse CI can be used in conjunction with a CI provider to prevent accessibility regressions.
Axe DevTools
Our favorite automated tool for accessibility audits is Axe DevTools, which can be installed as a Chrome extension or Firefox add-on (although, at the time of writing, the Firefox add-on is temporarily unavailable). There are free and paid versions of this tool; from our experience, you can get what you need from the free version, so don't let feature restrictions dissuade you from giving it a try.
According to Deque, the company behind this tool, the tests run by Axe DevTools find 57% of digital accessibility issues. This highlights the previous point that automated tests won't find every issue, but this tool can still help to find a large chunk of them.
Test results are helpfully broken down by level of severity, and there are options for highlighting the element on the page as well as in the code. This allows you to see exactly where an issue exists. Guidance for fixing an issue is also provided, although in some cases, extra research may be necessary.
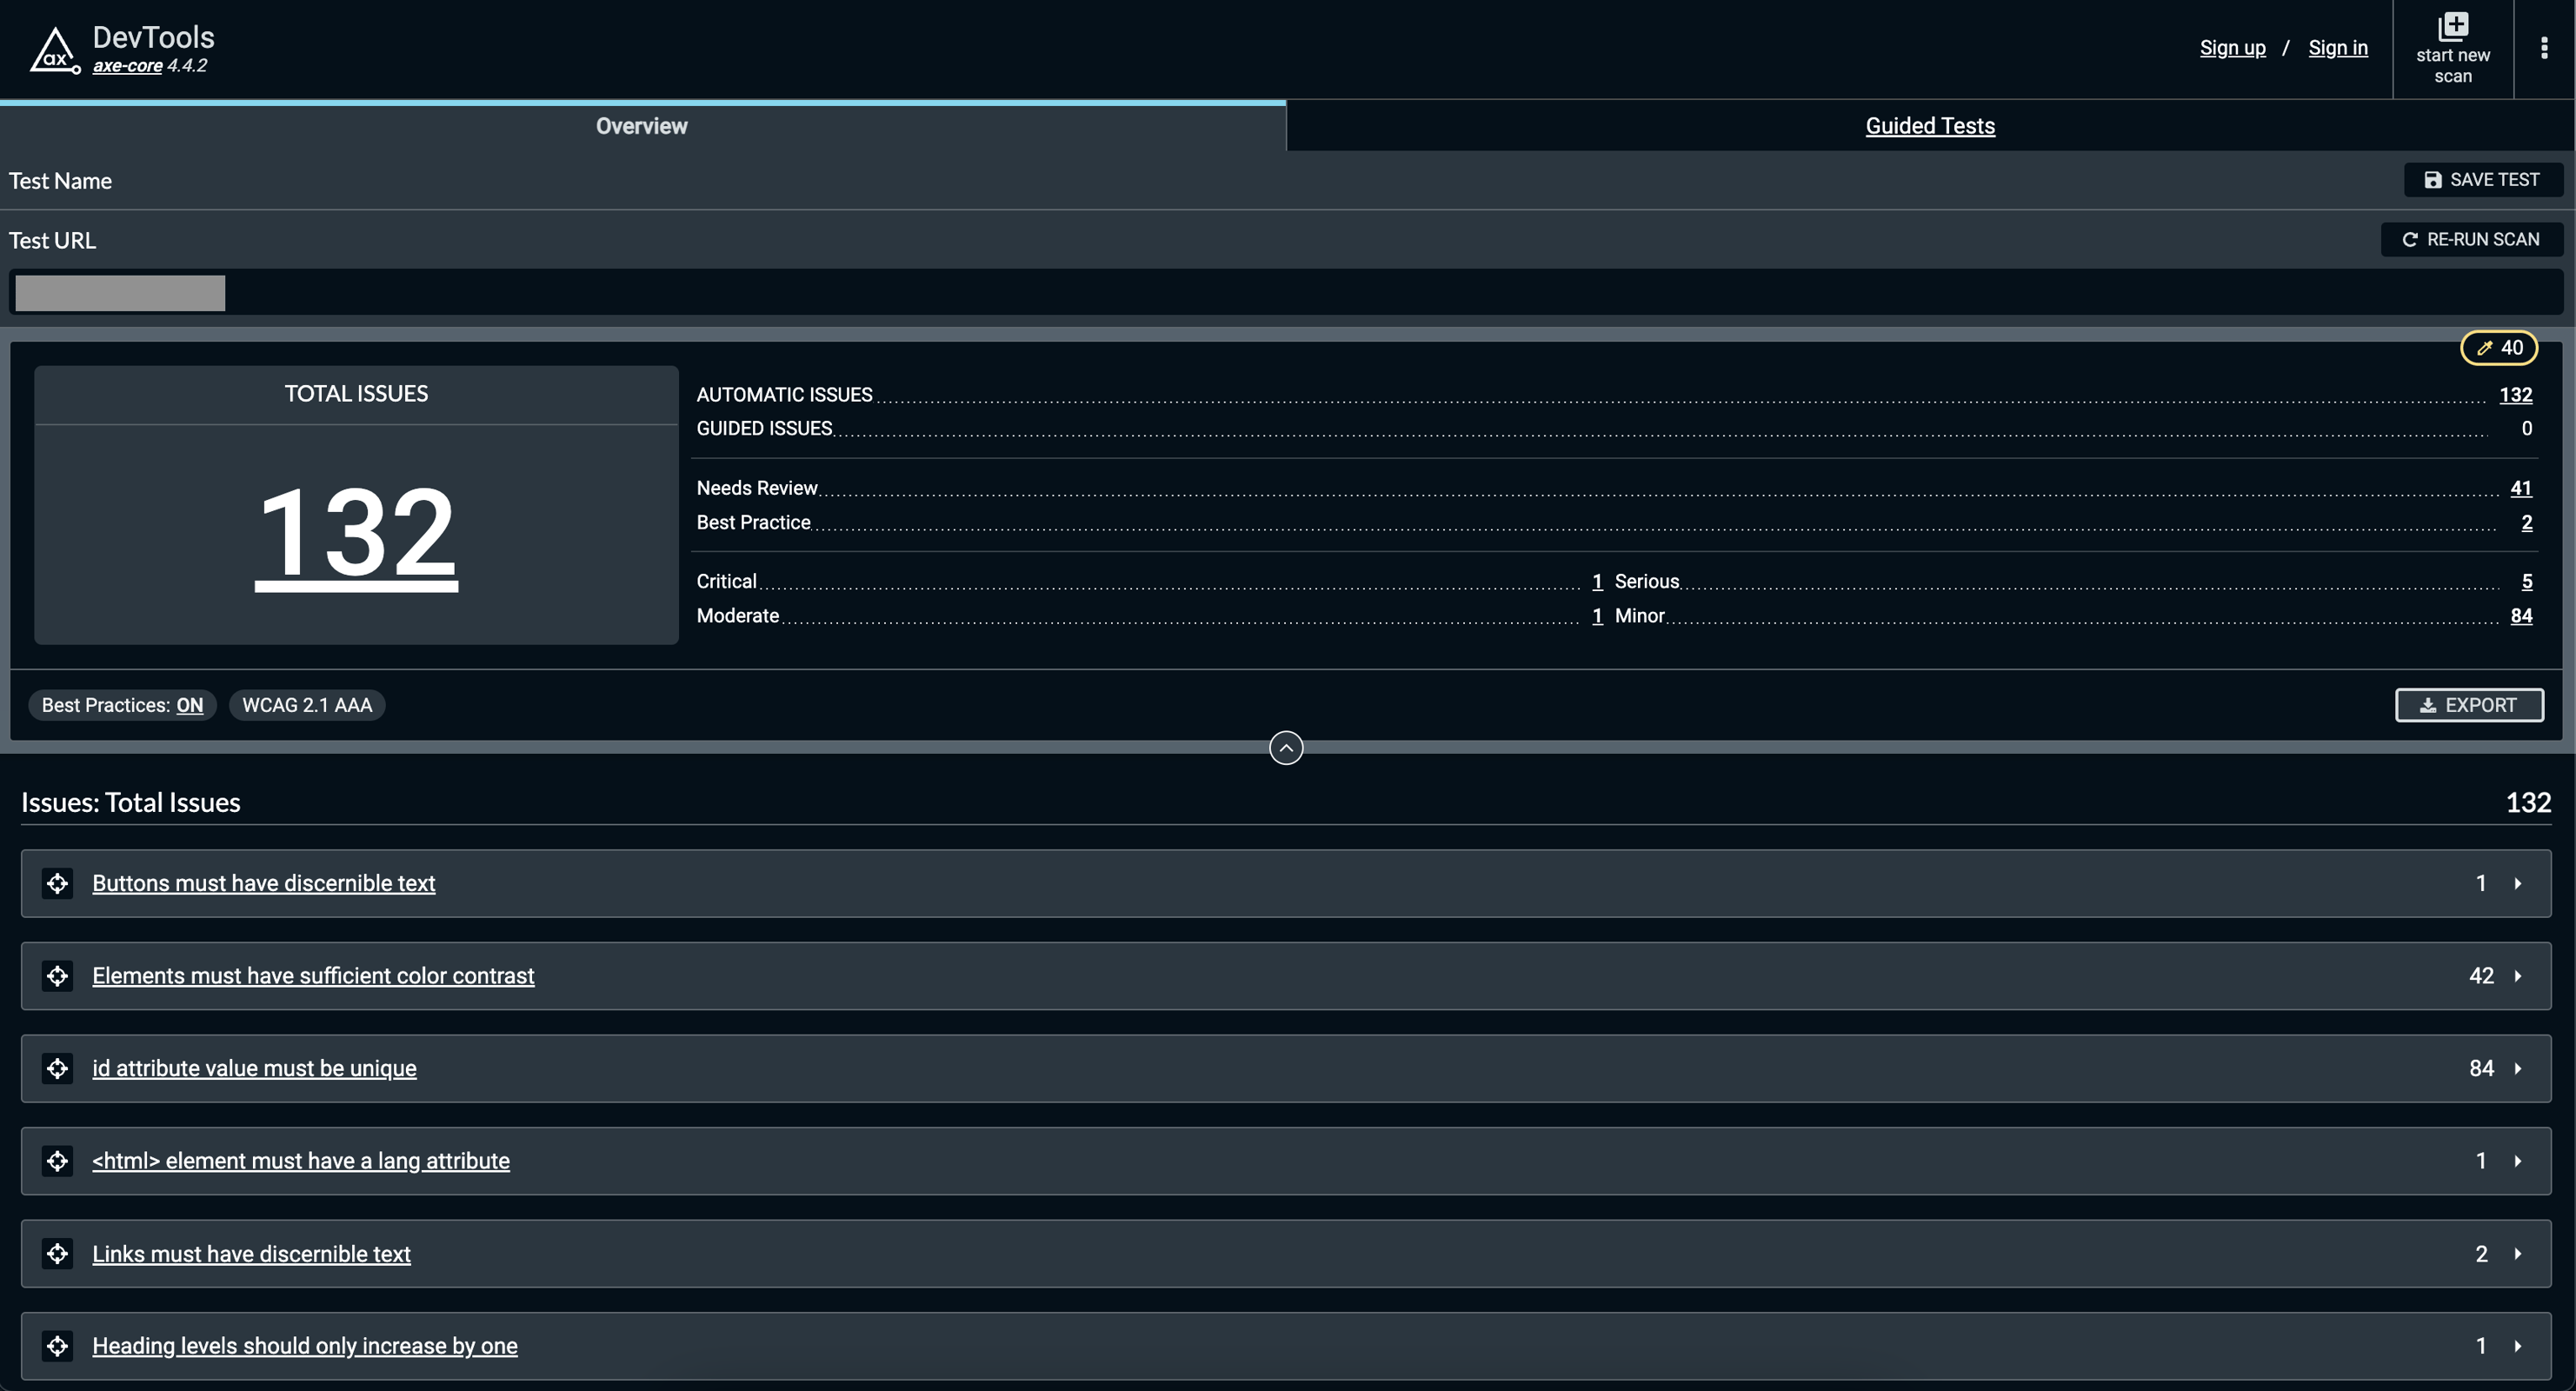
An example of Axe DevTools accessibility audit results. The total number of issues is provided, as is a separate count of the issues broken down by severity level (critical, serious, moderate, and minor). Individual issues can be toggled for more details.
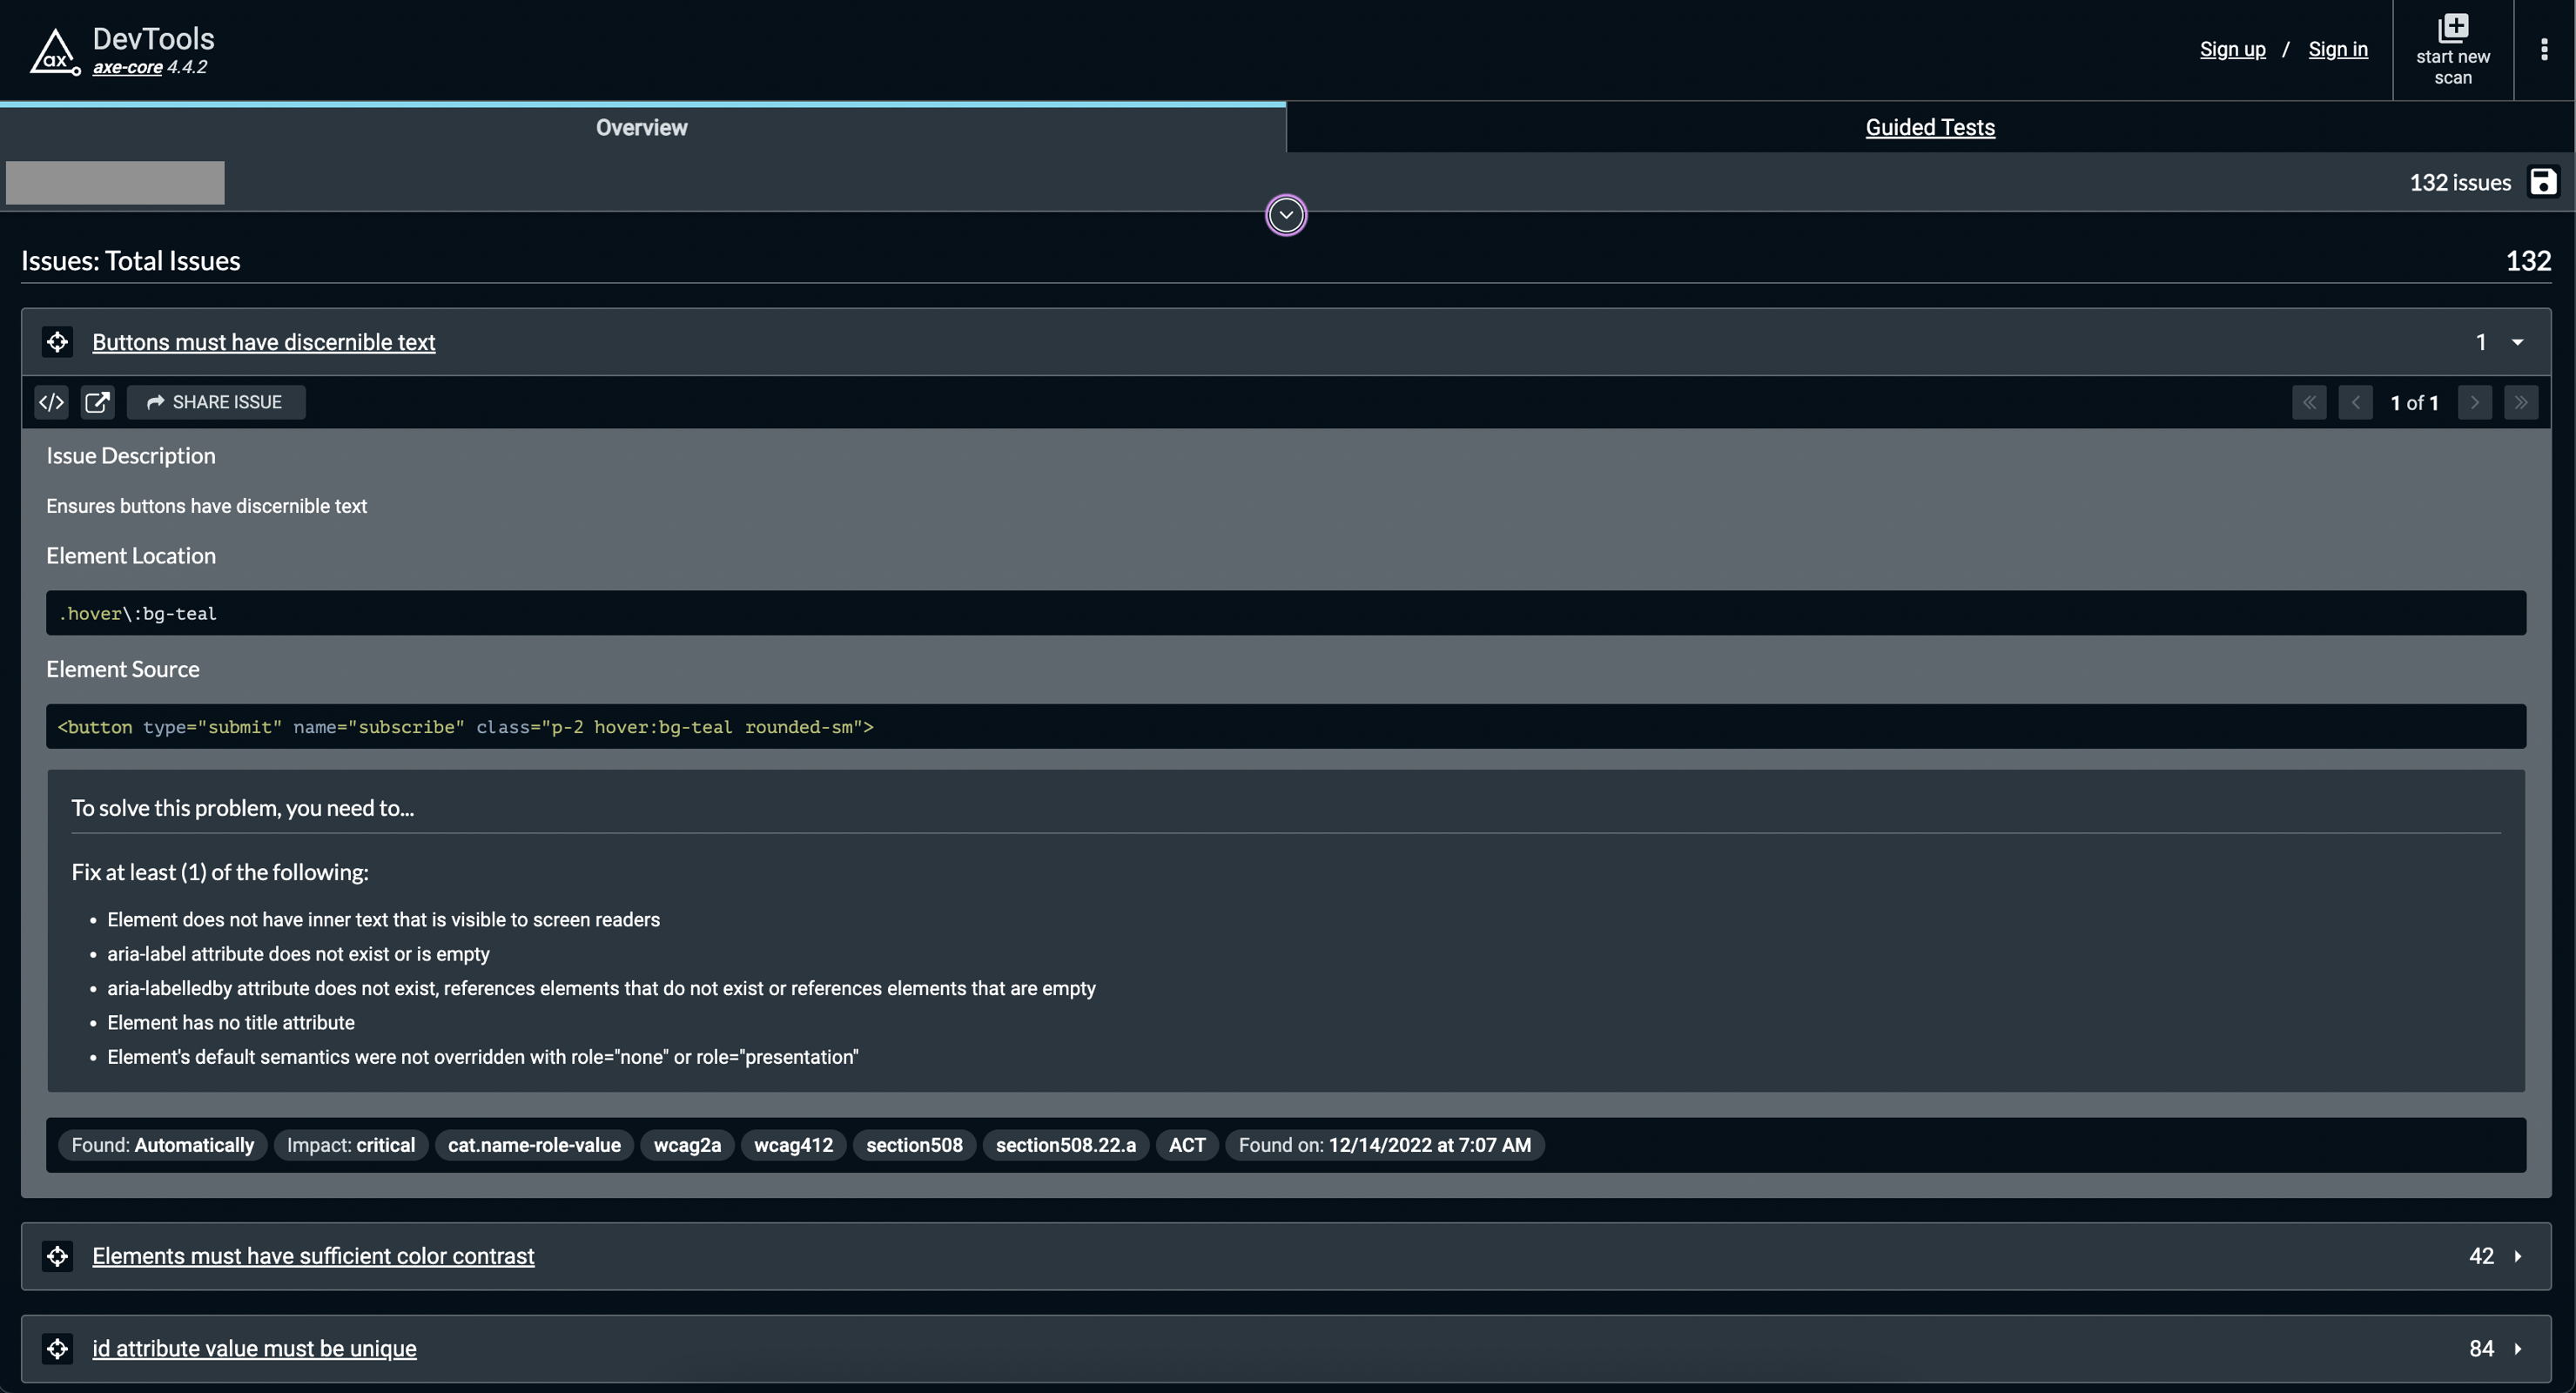
An example of the details for a specific issue detected by Axe DevTools. Details include an issue description, the location and source of the failing element, and methods for resolving the issue. There are also buttons for highlighting the failing element on the page or in the source code.
This tool also provides options for saving, exporting, and sharing the results of an audit, which can be helpful for passing them to other members of your team.
WebAIM WAVE
WAVE is a tool created by WebAIM that can be used on the WAVE site or via the WAVE browser extension. The browser extension is particularly helpful because it can be used to test sites during local development and/or pages that are restricted (e.g., they require an authenticated user or are behind a paywall). However, if you need to share the audit results, you'll have to use the site, since the browser extension doesn't include a save or share feature.
A WAVE audit will provide a breakdown of errors, with a separate section for contrast errors. It also provides visualizations of the page's HTML structure and tab order. The failing element for each issue can be highlighted on the page or in the source code, and details are provided to help remediate the error. You also have the option to run an audit either with or without styles applied to the page.
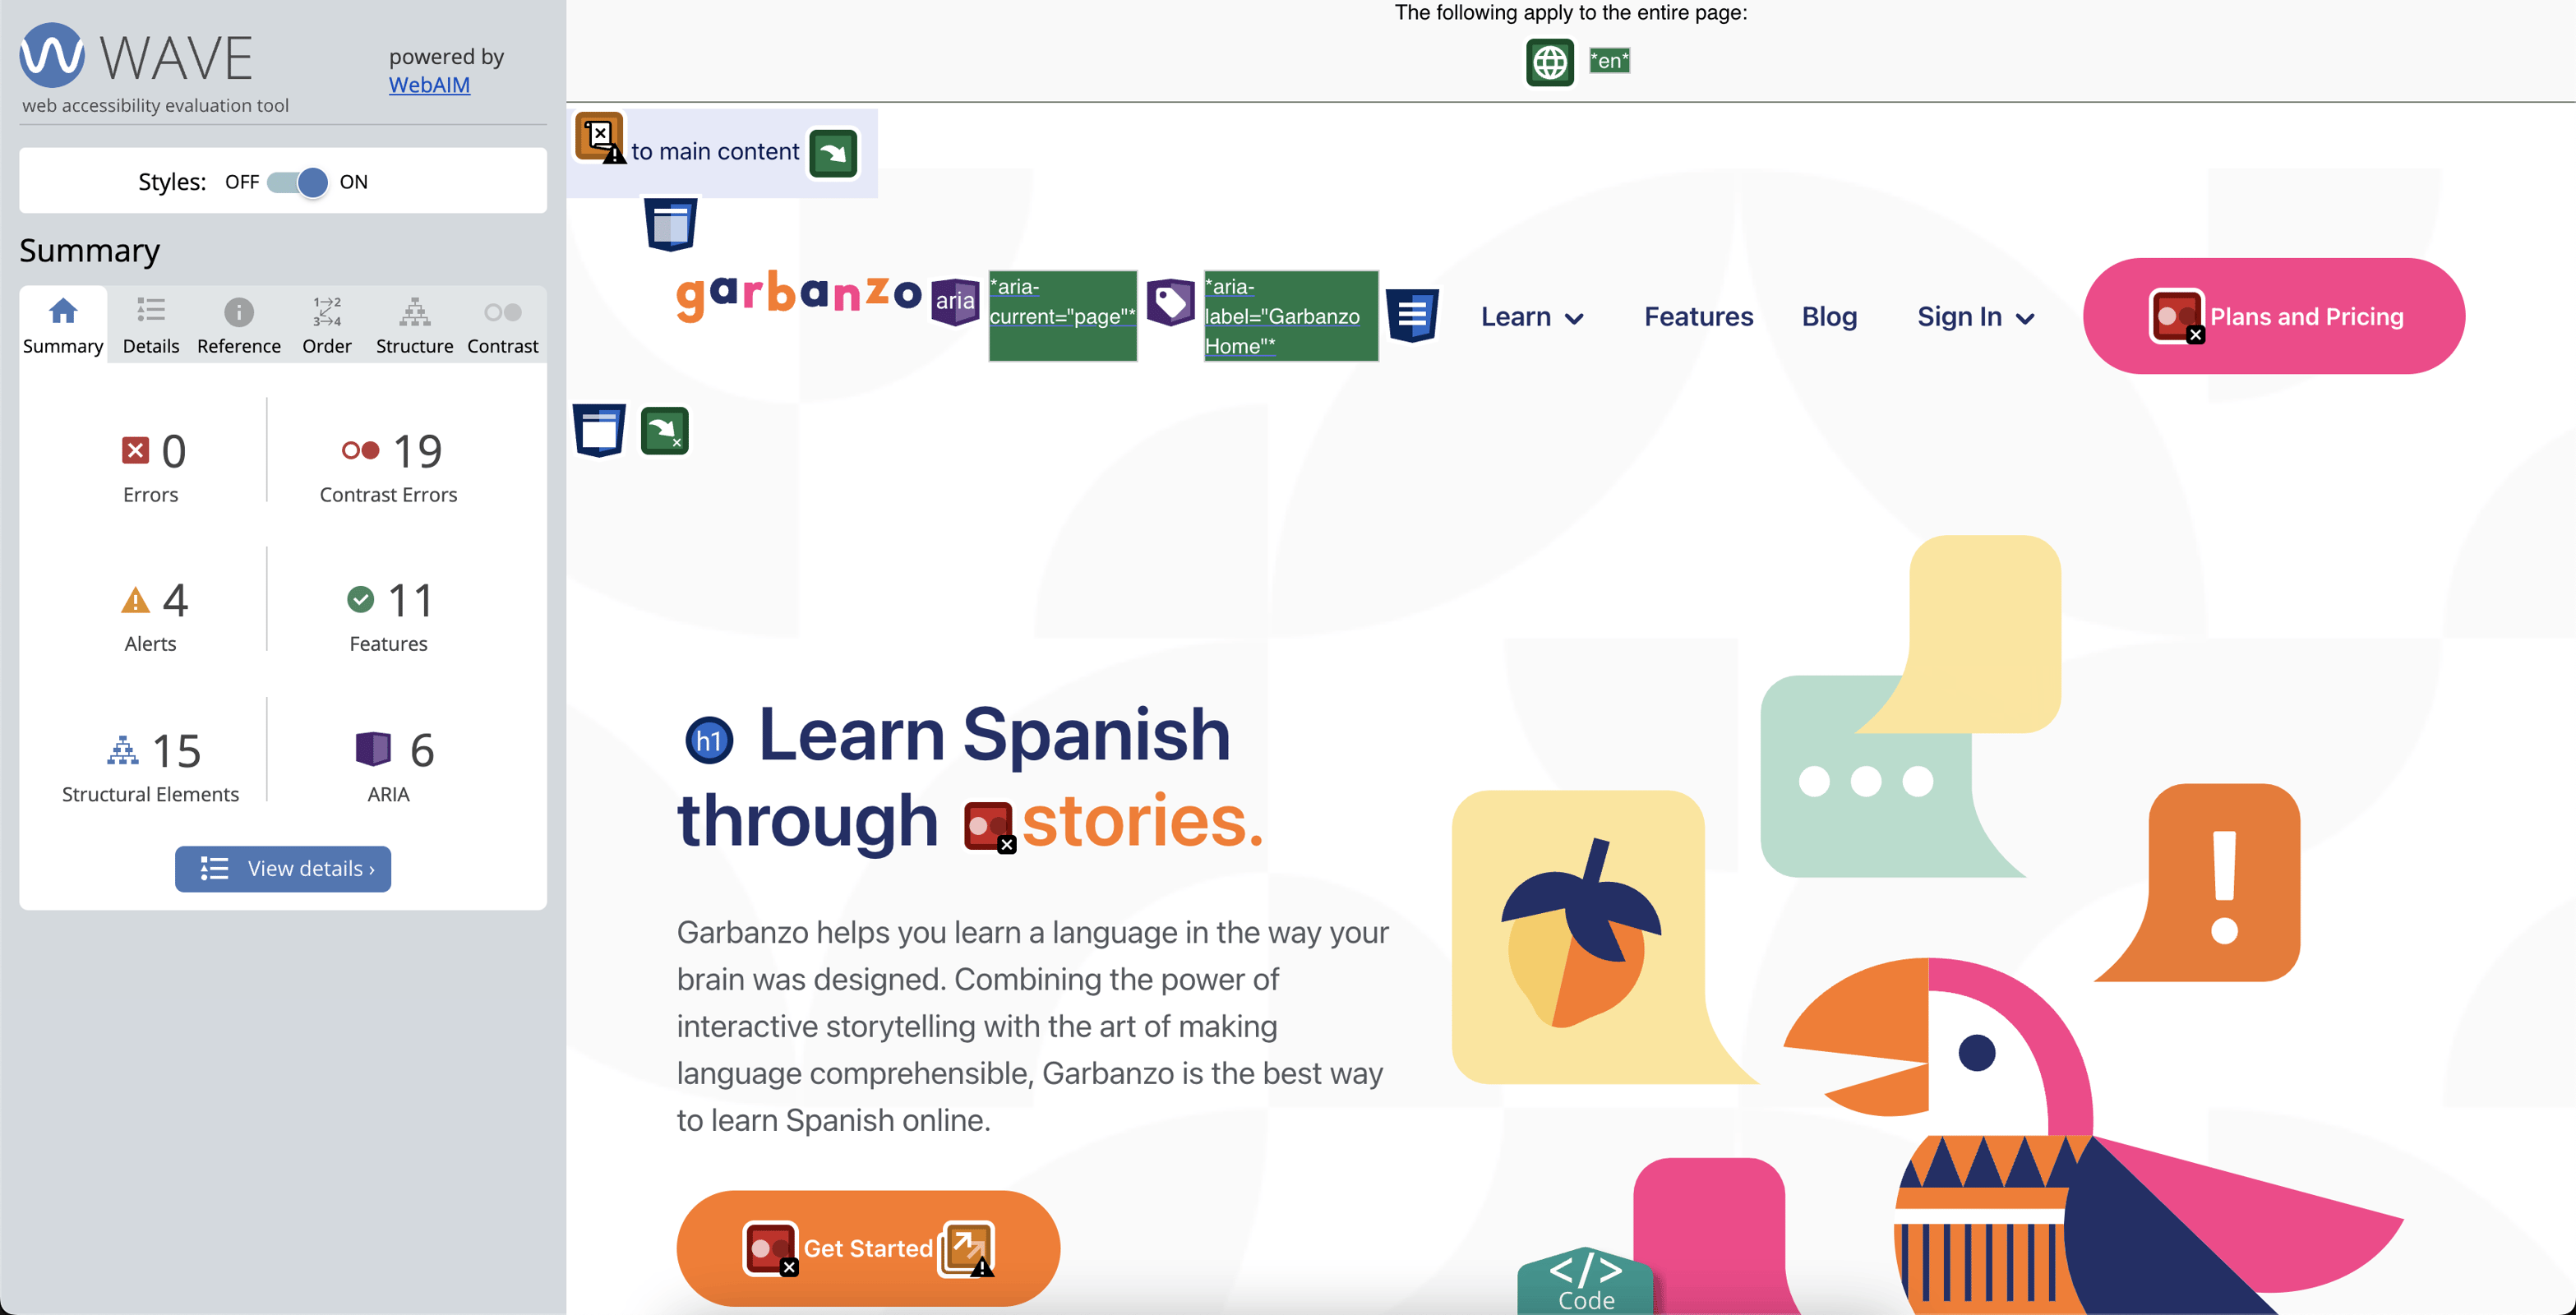
An example of WAVE audit results obtained using the browser extension. The page is overlaid with indications of any errors or alerts, as well as accessibility features (e.g., a skip link or ARIA attributes) and HTML structure (e.g., a heading's level). The sidebar includes a summary, result details, overviews of the page's tab order and HTML structure, and any existing contrast issues.
WAVE is a great tool for finding accessibility issues, but it's also useful for visualizing page structure (which is important for screen reader users) and tab order (which is important for keyboard-only users). However, it's important to note that this is not a substitute for doing manual testing.
With that in mind, let's jump into some manual accessibility testing techniques.
Manual testing
There are three key parts to doing a manual accessibility audit:
- Interacting with the site using only the keyboard
- Checking the site with a screen reader
- Double-checking questionable contrast ratios
Use the keyboard, and only the keyboard
If you usually interact with a site using a mouse or trackpad, it can be easy to overlook how things will work when you use the keyboard instead. This is understandable, since we're likely to interact with things as we normally would while we're building them. That's why it's important to go through your site using only the keyboard for both desktop and mobile layouts.
Doing so will help to identify the following potential issues:
- A missing skip link
- An illogical tab order (i.e., the order in which elements are focused does not follow the DOM order)
- Focus indicators that are missing or difficult to see
- Missing focus traps (e.g., when tabbing through a full-page mobile navigation menu, elements that are not in the menu can still be focused with a keyboard)
- Content that isn't visible is still keyboard focusable (e.g., an accordion item contains a link, and that link can still be focused even when the accordion item isn't expanded)
- Functionality that isn't present when using a keyboard instead of a mouse (e.g., a drag-and-drop feature may work with a mouse, but is inoperable with a keyboard)
So how do we perform keyboard-only testing? It can be broken down into the following steps:
- Tab through the entire page. This will allow you to check for a skip link, take note of the tab order, and see if every focused item has a clearly visible focus indicator.
- If your site has a mobile navigation menu, try opening it with
EnterorSpaceand closing it withEscape. When it's open, tab through every item inside it and see if you end up focusing on content outside of the menu. - Try interacting with buttons and links to see if using
EnterorSpacewill have the same results as clicking with a mouse. - Fill out any forms on the page. This will allow you to check that all form fields can be filled out with a keyboard.
- If there are any modals on the page, once they're opened, tab through every item inside of them to see if focus remains trapped within the modal and try closing them with
Escape. - If there are any other elements (e.g., accordions, cards that can be "flipped", drag-and-drop items) with which a user can interact via a mouse/trackpad, try interacting with those elements with the keyboard.
Quick tip: If you're tabbing through the page and you can't tell which element is currently focused, you can open the browser's console and enter document.activeElement. This will provide the DOM node that is currently focused.
If the site was built with semantic HTML, then most keyboard functionality will already be in place. Focus traps and custom elements (like drag-and-drop components) are typically the areas that require additional code for keyboard accessibility, so we recommend testing these areas particularly carefully.
Take a screen reader for a spin
Testing your site with a screen reader is another thing that can fall through the cracks while building a site, so it's a very important part of an accessibility audit. It will help to identify the following issues:
- Links that don't provide enough context (e.g., "Learn More")
- Different links that have the same text (e.g., a list of blog posts, each of which has a "Read More" link)
- Form fields that are missing labels
- Images that are used to convey information (i.e., they aren't used for decorative purposes) that don't have
alttext - Tables that are missing the proper headers
- Buttons that don't have accessible text (e.g., icon buttons)
While automated tools might catch some of these issues, there's no guarantee that they will, so it's best to do manual testing to make sure that nothing was missed.
On macOS, you can use VoiceOver to test your site's screen reader accessibility. On Windows, you can use NVDA. Both of these screen readers are free; VoiceOver comes pre-installed on macOS, but NVDA will need to be downloaded.
There are a lot of keyboard shortcuts for each of these screen readers, so we'll touch on the ones that will be the most helpful when doing an accessibility audit.
VoiceOver
First, to open VoiceOver, press command + fn + F5.
VoiceOver has something called a "rotor", which is something you'll want to open and check for each page of your site because it provides lists of the following for the page:
- Headings
- Links
- Form controls
- Landmarks (coming from HTML elements like
<nav>or<main>) - Frames (if there are any)
To open the rotor (once VoiceOver is on), press control + option + U. Each of the aforementioned lists is on a separate "page" in the rotor, so you can navigate back and forth between them with control + option + right arrow and control + option + left arrow. The up and down arrows can be used to navigate through items in a particular list.
A 2021 WebAIM survey found that 67.7% of screen reader users navigate headings in order to find page information. Only 8.1% stated that they read through the page, which indicates that many screen reader users will utilize the rotor (or similar functionality in other screen readers) to interact with a page. This is why it's particularly important to open the rotor and examine its contents.
Once you've looked through the rotor, you can close it with Escape. Next, tab through the page to hear what gets announced for interactive elements (buttons, links, etc.).
Finally, interact with custom elements (e.g., drag-and-drop), with the keyboard if possible, to hear what the screen reader will announce. This is an area where you're likely to find some problems. For example, check what gets announced when drag-and-drop functionality is used to reorder items.
NVDA
The steps for testing are the same for NVDA as they are for VoiceOver, so we won't rehash them here. But let's take a look at the relevant keyboard shortcuts.
To open NVDA, press control + alt + N.
This screen reader has something similar to VoiceOver's rotor, and it can be toggled with Insert + F7.
Double-check questionable contrast ratios
Once you've checked your site with the keyboard and a screen reader, there's one last phase of manual testing, and that's double-checking questionable contrast ratios. By "questionable", we mean issues that an automated tool flagged but was unable to confirm.
Sometimes, an automated tool will list a color contrast issue as a "potential" issue that requires manual review. In these cases, it's because the tool was unable to determine the background color of some text. This can happen for different reasons, such as the background being an image or being overlapped by another element.
Most of the time, these potential issues can be evaluated just by looking at the text. But it's best to use a contrast checker to be sure. If you know the hex codes for the text and background colors, you can plug them into WebAIM's contrast checker to see if the contrast ratio is acceptable.
If you need something that has a color picker tool, you can try the color contrast analyzer from TPGi. This is a free desktop app that's available for both macOS and Windows.
Wrapping up
Doing an accessibility audit can seem intimidating, especially if you're not that familiar with web accessibility just yet. The good news is that it's not as difficult as it seems, and there are plenty of tools out there that can help. The even better news is that doing an audit will help you to learn about accessibility – why it matters, how to test it, and how to improve it for both existing and future projects.
Some of the issues you’ll find will be easy fixes. But there will likely be some things that are more complicated and will take more effort to remediate. One of these more complicated UIs that you’ll likely come across is drag-and-drop, and it may be discouraging because it may feel like it’s impossible to fix. But don’t worry, it isn’t. You can make just about anything fully accessible, often more easily than you would have thought.
(If you do happen to have a drag-and-drop UI that needs to be made accessible, we’re here to help. We have a post about how to build an accessible drag-and-drop UI, so feel free to check that out if you need some guidance.)
Thanks for reading, and we hope to see you in the next one!
Looking for a web development partner? Zaengle is the preferred development team for a number of businesses and organizations, large and small. We'd love to connect and see how we can help you.

By Rachel Opperman
Engineer
What happens when you cross years of study in biology and medicine with a degree in computer science? You get someone like Rachel.


